Think of this process like giving your computer a reboot when it’s acting funky. Similarly, your garbage disposal might just need a reset to function smoothly again. Whether it’s due to a jam, a power issue, or just a glitch in its “brain,” resetting can often solve the problem. In the following sections, we’ll guide you step-by-step through how to do just that. With a bit of patience and our easy-to-follow instructions, you’ll have your Waste King humming along in no time.
Understanding Error Code UE
So, what exactly is Error Code UE, and why is it showing up on your Waste King garbage disposal? In simple terms, this error code indicates an imbalance in the system, which the unit is sensitive to. It’s somewhat like when your washing machine vibrates vigorously because the load isn’t evenly distributed. Similarly, this imbalance can cause your disposal to stop working effectively.
Most often, this imbalance arises if something is lodged in the blades or if the disposal is overloaded. Sometimes, it could be due to improper installation or a power supply issue. Understanding these potential causes is crucial because it helps in diagnosing the problem accurately. By pinpointing the cause, you can take the right steps to fix it, ensuring your garbage disposal runs smoothly and efficiently.
Once you know what might be causing the error, you can address it head-on. This process might feel a bit technical at first, but remember: you’re essentially setting things right on a miniature scale. It’s all about ensuring things are in harmony inside the appliance, and your disposal will be back to its old self before you know it.
Preparing to Reset Your Waste King Garbage Disposal
Alright, time to get down to business! Before you dive into resetting your disposal, you’ll need to prepare a little. Just like prepping for a small home repair, gather your tools and make sure everything is safe to work with. First things first, safety is key here. Always make sure the power is off before you begin; your garbage disposal should never be active while you’re working on it.
To turn off the power, simply unplug the unit from under the sink or switch off the breaker that powers it. This is essential for avoiding any risk of electrical shock when you’re handling the machinery. Think of it as giving your disposal a chance to chill out — a sort of “time-out” where you both can regroup before you tackle the problem together.
Next, make sure you have a flashlight handy. You’ll need to see inside the disposal chamber clearly. While it might seem like a small task, a good view can make a big difference in understanding what’s causing the issue. Now, with your safety measures in place and your tools ready, you’re set to move on to the next step.
Resetting the Waste King Garbage Disposal
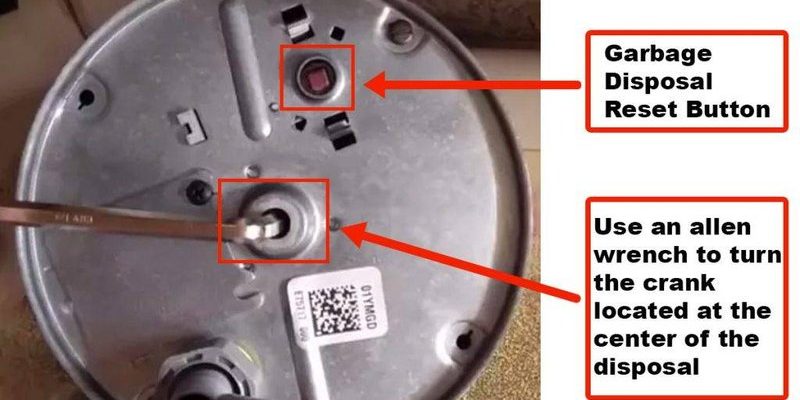
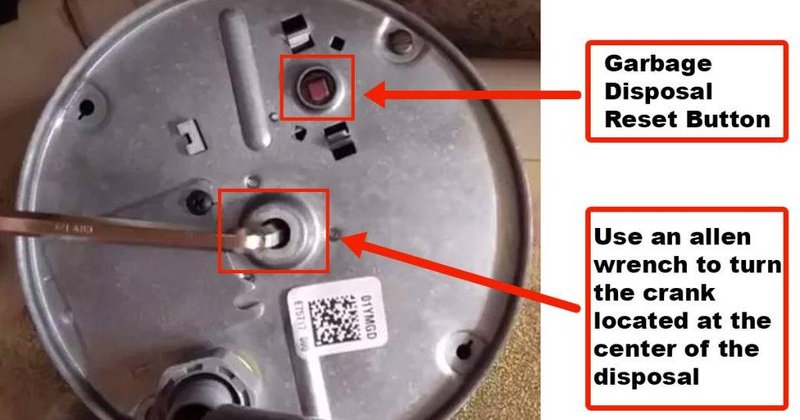
Here’s the deal: resetting your Waste King garbage disposal is a straightforward process if you follow these steps carefully. Once the power is safely turned off, locate the reset button. It’s usually found at the bottom of the unit, often a small, red button. Think of it like the restart button on your computer; it’s there to help you clear out the cobwebs and get things spinning again.
Press and hold this reset button for about 10 to 15 seconds. This allows the system to recalibrate, effectively clearing any minor glitches that might have caused the code to appear. Imagine it like giving your disposal a power nap — a brief pause to regain its bearings.
After releasing the button, the next step is to plug the unit back in or switch the power back on at the breaker. This reactivation lets you check if the reset has been successful. You’ll know things are back to normal if the disposal runs smoothly without any peculiar sounds or further error codes.
Troubleshooting Further Issues
If your garbage disposal still isn’t cooperating, don’t worry. Sometimes a few more steps are needed to get to the root of the issue. Let’s dig a little deeper, like a detective on the trail of a stubborn clue. First, check if there is a blockage in the disposal. Using a flashlight, peer inside the drain to see if there’s an obstruction. It could be something as simple as a small piece of bone or a utensil that’s slipped down.
If you spot an item, use pliers or tongs to carefully remove it. Avoid using your fingers to reach inside, as the blades can be sharp. Often, just removing the blockage can resolve the issue, letting your disposal return to its smooth, efficient operation.
Sometimes, the issue may be more technical, like a wiring problem or a component in need of replacement. In such cases, consulting the appliance manual or reaching out to Waste King customer support can provide further assistance. They’re like your tech support team, ready to guide you through whatever troubleshooting your disposal might need.
Maintaining Your Waste King Garbage Disposal
Now that you’ve got your garbage disposal back in action, let’s talk about keeping it in great shape. Think of maintenance as the regular check-up every appliance needs to stay healthy. Routine care not only prevents future errors but also extends the life of your disposal, saving you time and money in the long run.
A simple tip is to run cold water before, during, and after using the disposal. The cold water helps solidify grease and oils, making them easier to chop up and wash away. Similarly, cutting waste into smaller pieces before feeding it into the disposal can reduce the chance of clogs or jams.
Consider having a habit of cleaning the disposal monthly. You can do this by grinding up ice cubes and citrus peels — the ice helps sharpen the blades, while citrus oils provide a fresh smell and help break down grease buildup. By incorporating these straightforward habits into your routine, you’ll ensure that pesky Error Code UE remains a thing of the past.
By following these steps, you’ve not only fixed the issue but also become more knowledgeable about your appliance. With this guide, you’re now prepared to tackle any similar problems in the future, keeping your kitchen running smoothly and efficiently!