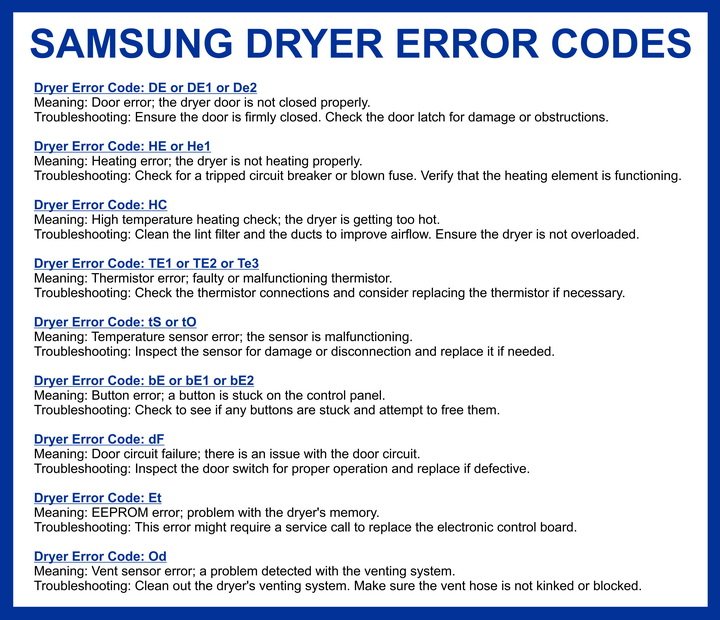
Error codes on appliances like your Samsung dryer are kind of like your dryer’s way of speaking to you. Think of them as text messages from your dryer, giving you hints about what’s going on under the hood. When you see E2, it’s a specific code indicating an issue with the temperature sensor. While that might sound technical, you don’t need to be an appliance engineer to solve it. Often, it can be as straightforward as a reset or a minor check-up on your dryer’s components. Let’s dive into the steps to understand and resolve the E2 error code.
Understanding the E2 Error Code
First things first, what exactly is this E2 error? Imagine if your dryer had a built-in thermometer monitoring the heat levels. The E2 code pops up when there’s a hiccup with that thermometer, technically known as the temperature sensor. This sensor is vital because it ensures your dryer isn’t getting too hot or too cold, maintaining just the right balance for drying clothes effectively.
When the temperature sensor goes awry, it can throw off your dryer’s entire operation. It’s comparable to a car’s speedometer not working correctly. You wouldn’t know how fast you’re going, and similarly, your dryer can’t adjust to the proper heat levels. This can lead to inefficient drying or, worse, overheating, risking damage to your clothes or the appliance itself. So, when you see the E2 error, it’s your dryer’s way of saying, “Hey, something’s not quite right with the heat settings here!”
Now, why does this happen? Several factors could be at play. Dust or lint build-up, a loose wire, or even just the natural lifecycle of your dryer’s parts can contribute to sensor issues. However, the good news is that a reset often helps recalibrate things and get your dryer back in working order.
Steps to Reset Your Samsung Dryer
Step 1: Power Cycle the Dryer
To begin resetting your Samsung dryer, you’ll want to start with a basic power cycle. It’s like rebooting your computer when it’s sluggish. Here’s the deal: unplug the dryer from its power source. If it’s a hardwired model, turn off the circuit breaker supplying power to the dryer. Leave it off for a good 5 to 10 minutes. This gives the system time to reset fully, clearing any temporary glitches that might be causing the error code.
While waiting, take a look at the power cord and the outlet. Make sure everything looks secure and there’s no visible damage. A faulty power source can sometimes mimic sensor issues, leading to error codes.
After the wait, plug the dryer back in or switch the circuit breaker back on. Turn on the dryer and see if the error code reappears. If it doesn’t, congrats! Your dryer might just have needed a breather. If it does come back, no worries, we’ve got more steps to try.
Step 2: Check the Temperature Sensor and Wiring
If the power cycle didn’t do the trick, the next step involves a bit more detective work. Let’s think of your dryer’s temperature sensor as the device’s internal weather forecaster. When it’s off, your dryer can’t predict the correct drying climate. To ensure it’s functioning well, you might need to access the inside of your dryer, so make sure you feel comfortable doing this or consult the user manual for guidance.
Unplug the dryer (for safety!) and locate the sensor and wiring. This might require you to remove some panels, so take your time and keep track of any screws you remove. Inspect the sensor and the wiring connected to it. You’re looking for signs of damage or disconnection.
Sometimes, a simple reconnection or cleaning can solve the issue. Use a soft brush or cloth to gently clean any dust or lint that might be affecting the sensor’s performance. Once you’re done, reassemble your dryer, plug it back in, and check if the E2 code has cleared.
Step 3: Perform a Factory Reset
If you’ve tried the above steps and the error code persists, it might be time for a factory reset. This option resets your dryer’s settings back to the original factory settings. Think of it as giving your dryer a fresh start, like hitting the ‘refresh’ button on your browser when a page isn’t loading right.
To perform a factory reset, you’ll need to consult your Samsung dryer manual since the steps can vary slightly depending on the model. Generally, it involves pressing and holding a combination of buttons on the control panel. Follow the instructions carefully to avoid accidentally setting unwanted configurations.
Once completed, test your dryer with a small load of clothes. If the E2 error is resolved, you’re all set! If not, there might be a more serious issue at play, and it could be time to call in a professional repair service.
Preventative Tips to Avoid Future Errors
No one likes dealing with error codes interrupting their laundry day. To minimize the chances of encountering the E2 error again, consider some preventative measures. Regular maintenance goes a long way in keeping your dryer running smoothly. Routinely clean the lint filter and exhaust duct, as these can impact your dryer’s efficiency and sensor readings.
Additionally, avoid overloading your dryer. Just like trying to carry too many groceries, an overloaded dryer can strain its components, leading to errors. Keep an eye on your laundry load sizes, and your dryer will thank you for it with fewer issues.
Finally, schedule a professional check-up every so often. Even if everything seems to be running smoothly, having an expert give your dryer a once-over can catch any potential problems before they become problematic. By staying proactive, you’ll enjoy hassle-free laundry days and extend the life of your appliance.
Remember, while the E2 error can be a nuisance, it’s manageable with a little bit of patience and troubleshooting. Your Samsung dryer is a reliable companion, and by following these steps, you can ensure it stays in tip-top shape.