So, what does error code OE mean anyway? In simple terms, it usually indicates an overload or something that’s stopping your disposal from doing its job. Picture it like a traffic jam on a busy highway; when too much gets jammed in the disposal at once, or something’s caught up in the blades, the motor gets overloaded. This stops it from spinning and grinding up the waste, triggering the error code. But, just like clearing out that traffic jam, resetting your disposal should get things moving again. Let’s dive in and look at how you can do this yourself, even if you’re not exactly a tech wizard.
Understanding the Error Code OE
The error code OE popping up on your Insinkerator is a signal from the appliance that it’s overloaded. Think of it as your disposal saying, “Whoa, slow down, something’s not right here!” This happens because the disposal’s internal safety system is designed to shut down the motor to prevent overheating or damage. It’s much like how a circuit breaker works in your home – it flips off when there’s too much electricity flowing through to prevent fires.
So, what’s causing this overload? Most commonly, it’s putting too much food waste down the disposal at a once or trying to grind up something that’s too tough. Fibrous vegetables like celery or artichokes and starchy materials like potato peels are notorious for causing problems because they don’t break down easily. Additionally, if there’s a foreign object like a spoon or non-food item that’s accidentally slipped in, that could cause the motor to stall, leading to the error code.
If you’ve ever had this happen, you know it’s not just about clearing the jam. It’s also about resetting the system once the blockage is gone. That’s where knowing how to reset your garbage disposal comes in handy. Unlike a computer that might need a complex series of commands, your disposal often just needs a simple reset button press.
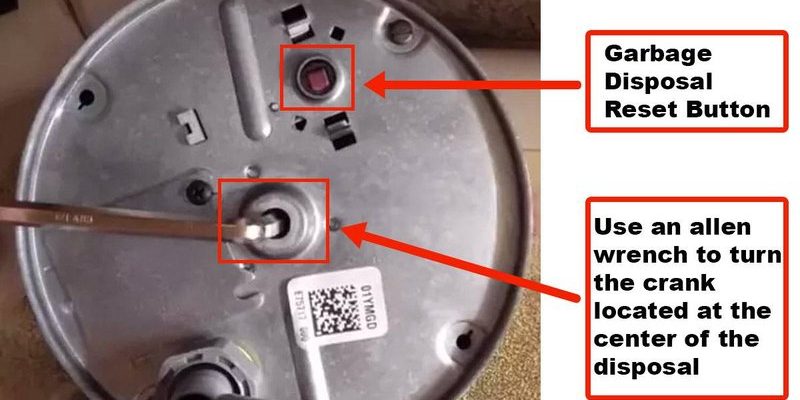
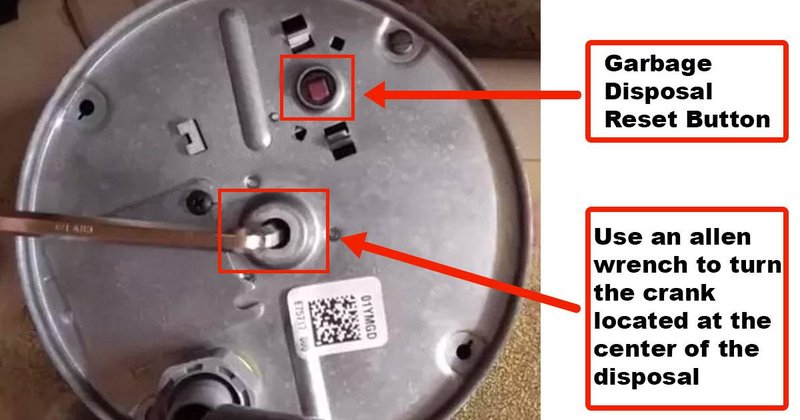
Locating the Reset Button
Here’s the deal: every Insinkerator garbage disposal comes equipped with a reset button, and finding it is easier than you might think. It’s usually located at the bottom of the unit. If you look underneath your sink, you’ll notice a small, red button on the base of the disposal. This is your reset button, akin to a tiny “restart your engine” button for the disposal.
Before you press it, make sure to switch off the disposal and the power supply. This is a safety step, much like putting on a seatbelt before driving. You don’t want any accidents if the disposal were to suddenly start running while your hand is in the vicinity. After ensuring it’s safe, press the button gently.
Once you’ve pressed the reset button, wait a few seconds, and then try to run the disposal again. Turn the power back on and flip the switch. If everything’s clear, you should hear the familiar hum of the motor as it starts up, ready to tackle your kitchen scraps once more. If it doesn’t start, there could still be a jam that needs clearing.
Clearing Blockages and Avoiding Future Errors
Sometimes, resetting the disposal isn’t enough. If it doesn’t start after pressing the reset button, there might still be something trapped inside. To fix this, use a flashlight to peer down the disposal. A pair of tongs or pliers can help retrieve any visible blockages. Remember, keep your hand out of the disposal to avoid injury—safety first!
To minimize the chances of an OE error in the future, it’s crucial to watch what you feed your disposal. Avoid putting fibrous food, starchy materials, or non-food items down it. Running cold water before, during, and after grinding can also help keep the blades and motor running smoothly. Cold water helps solidify greases and oils so they can be chopped up and flushed away, preventing clogs and buildup.
Lastly, consider regular maintenance. Occasionally grinding up citrus peels or ice can help clean the blades and keep everything smelling fresh. If persistent issues occur, it might be worth having a professional take a look. Regular checkups and good disposal habits will ensure your Insinkerator remains a reliable kitchen helper for years to come.
In conclusion, while dealing with an error code OE might seem daunting at first, it’s often just a matter of resetting and checking for blockages. With a bit of patience and these simple steps, you’ll have your kitchen back to normal in no time. Happy grinding!