Now, while error codes might sound technical and scary, think of them as your appliance’s way of sending out an SOS signal. It’s basically saying, “Hey, I need a little attention here!” The E2 error typically indicates that there’s a jam or a power issue. It’s like when you accidentally overstuff a drawer, and it won’t close properly. No worries though—resetting your Kitchenaid disposal is a straightforward process, even if you’ve never tinkered with it before. Let’s dig into the step-by-step guide to getting your disposal back in tip-top shape!
Understanding the E2 Error Code
Before diving into the reset process, it’s crucial to understand what this E2 error really means. You see, the E2 code on a Kitchenaid garbage disposal often signals that there’s a blockage or a jam somewhere. Imagine you’re trying to put too many leaves into a leaf blower—eventually, the machine would clog. Similarly, if your disposal is taking on too much or something it can’t handle, it throws the E2 code. This is its way of telling you to clear things out.
Another possible reason you might see an E2 error is due to power overload. Much like when you overload an electrical socket and trip a circuit breaker, your disposal might be overexerting itself. This typically happens if something gets stuck in the blades, causing the motor to strain more than usual. It’s the appliance’s self-protection mechanism kicking in, which, while it might be annoying, is actually a good thing—a little rest and reset can prevent more serious issues down the line.
So, what does all this mean for you? Well, it suggests a few easy checks and balances. Think of it like this: if your car isn’t starting, one of the first things you’d check is the fuel. Similarly, with a garbage disposal, start by identifying if there’s a jam or if the unit is overloaded. Once you’ve spotted the issue, resetting becomes a walk in the park. Keep in mind, resetting on time not only extends the life of your machine but also ensures your kitchen remains a pleasant space, free of food scraps and foul smells.
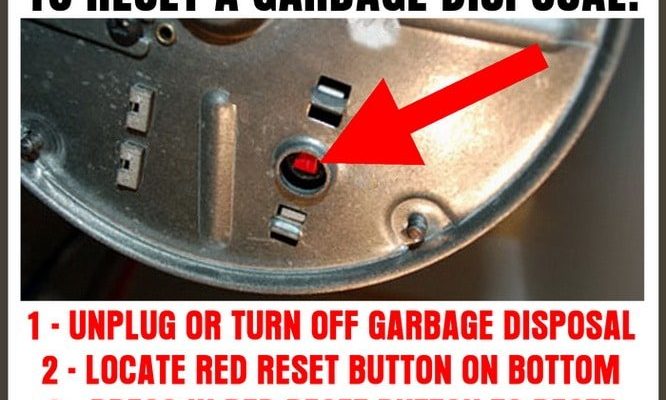
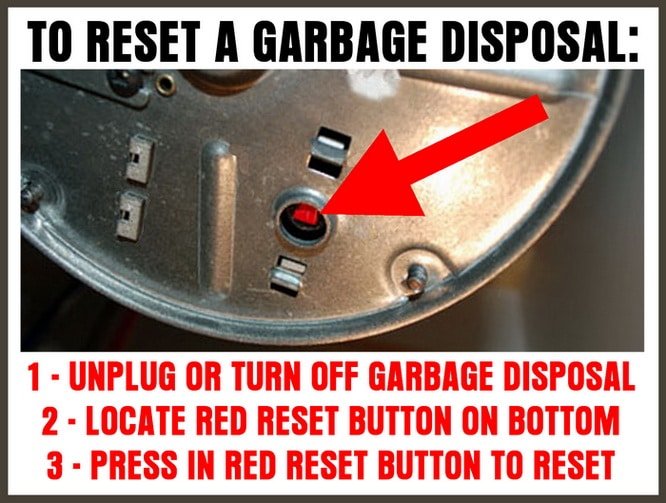
How to Reset Your Kitchenaid Garbage Disposal
All right, let’s get down to business—resetting your Kitchenaid garbage disposal. First, ensure safety by turning off the power. This is crucial. You wouldn’t stick your hand into a blender while it’s running, right? The same logic applies here. Locate the switch controlling your disposal, usually found beneath your sink or on your circuit breaker panel, and turn it off to cut the power.
Next, you’ll need to find the reset button on your disposal unit. It’s typically a small, red button located on the bottom or side of the unit. If the disposal has overheated due to the jam or overload, this button may have popped out. Press it gently to reset the unit. Think of it as rebooting your computer after it freezes. If all goes well, the button will click back into place, indicating that the reset has been successful.
After resetting, turn the power back on and test the disposal to see if the E2 error has cleared. Run some water and switch it on briefly. If it works smoothly, you’ve done it! Sometimes, the reset might not resolve the issue immediately if there’s still a blockage. In that case, you may need to manually clear the jam using a wrench or a disposal tool to free up the blades. Once cleared, repeat the reset process, and your machine should run like new. Sometimes, a little patience and gentle persuasion is all it takes.
Preventative Tips to Avoid Future E2 Errors
Now that you’ve successfully reset your Kitchenaid garbage disposal, let’s talk about how to prevent future E2 errors. The old saying goes, “Prevention is better than cure,” and it holds true for garbage disposals as well. One of the best ways to avoid clogging or overloading your unit is by being mindful of what you’re putting down the drain. Your garbage disposal isn’t a trash can; it’s more like a helper that can handle small scraps, but not everything. Avoid feeding it hard materials like bones or fibrous items such as celery stalks, as these are notorious for causing jams.
Another tip is to run your disposal regularly, even if you don’t have food to grind. Think of it like exercising a muscle—regular use keeps it in shape and prevents rust and corrosion from setting in. All it takes is a quick run with some cold water for a few seconds to keep things moving smoothly. Cold water helps solidify any grease or fats, making them easier to chop up, rather than turning into a sticky mess.
Lastly, consider cleaning your disposal with some natural ingredients. A common household remedy is grinding citrus peels like lemon or lime every now and then. These not only freshen up the smell but also help clean the blades. Baking soda and vinegar can also be your disposal’s best friends, providing a fizzy, natural cleaning solution that breaks down residue. By incorporating these habits, you’ll find your disposal encounters fewer jams and errors, leaving you with a smoothly running kitchen appliance.
Wrapping Up: Your Path Forward
Resetting your Kitchenaid garbage disposal after encountering an Error Code E2 doesn’t have to be a headache. By understanding what the error signifies and following a simple reset process, you’re well-equipped to handle this common issue. Remember, it’s all about safety first—ensure the power is off whenever you’re troubleshooting or performing maintenance.
Keep in mind the tips we’ve discussed to minimize future occurrences of the E2 error. Careful usage and regular maintenance can keep your disposal in top shape for years. Just like with any appliance, treating it with a bit of care and attention goes a long way. If problems persist despite your best efforts, don’t hesitate to consult a professional—sometimes a bit of expert advice is all you need.
Incorporating these steps into your routine will not only fix the current problem but also empower you to handle future issues with confidence. So the next time your disposal acts up, you’ll know exactly what to do. Here’s to a hassle-free kitchen experience!