Imagine this: your garbage disposal is like a safety valve for your kitchen, ensuring that everything stays neat and tidy. The “E1” error is just a way for the disposal to tell you it needs a little TLC to get back to its efficient self. It’s like your car’s check engine light, signaling that something isn’t quite right, but likely isn’t catastrophic. Let’s walk through the steps you need to take to breathe new life into your Waste King garbage disposal.
Understanding the “E1” Error Code
Before diving into the fix, it’s worth understanding what the “E1” error code really means. Think of it as your disposal’s way of saying it’s in trouble. This error typically indicates an overload or a jam within the system. You see, your disposal has a built-in circuit breaker that trips when it senses something’s amiss. Just like a circuit breaker in your home stops the flow of electricity to prevent overheating or damage, the Waste King’s breaker interrupts operation to protect the motor.
What causes this issue, you might ask? Well, several culprits could be responsible, from a piece of hard food or bone jamming the blades to a power surge overloading the unit. Sometimes, you might even have accidentally let too much food waste down at once, overwhelming the disposal’s capacity. Whatever the case, this code is a preventive measure that keeps the motor from burning out or getting damaged.
Here’s the silver lining: understanding the problem is the first step toward solving it. By recognizing the conditions that trigger the “E1” error, you can better prepare for the future and know how to prevent it from happening again. But for now, let’s focus on resolving the issue at hand and getting your disposal back to its prime grinding condition.
Steps to Reset Your Waste King Garbage Disposal
So, how do you reset your Waste King garbage disposal and say goodbye to that pesky error code? Picture this process like hitting the reset button on your computer when it freezes — you’re giving it a fresh start. Here’s how you can do that:
Step 1: Safety First
First things first, ensure your safety. Disconnect the power to your disposal to avoid any surprises. This is crucial because you’ll need to poke around inside the unit, and you certainly don’t want it turning on unexpectedly. Most disposals are plugged into a nearby outlet under the sink. Simply unplug it or turn off the switch on your electrical panel dedicated to your kitchen appliances.
Step 2: Clear the Jam
Now that it’s safe, you’ll need to free the blades. You might need a flashlight for this. Shine it into the disposal to see if there’s anything obvious causing the blockage, like bones or even utensils that may have slipped down there. Using a pair of tongs or pliers, carefully remove anything you find. It’s a bit like fishing — you’re trying to get that tricky item out without causing more of a mess.
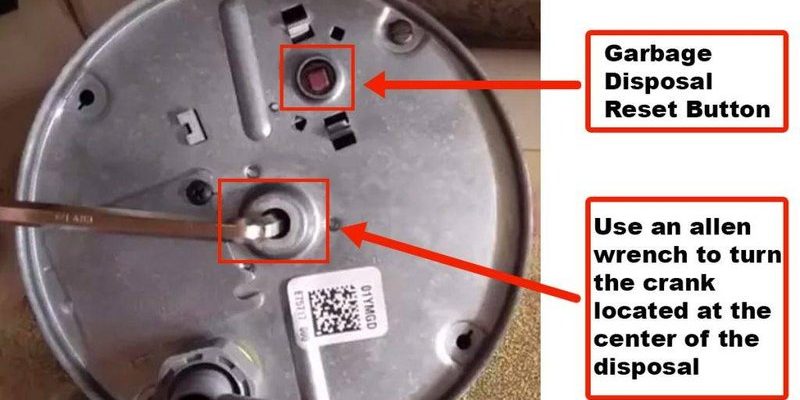
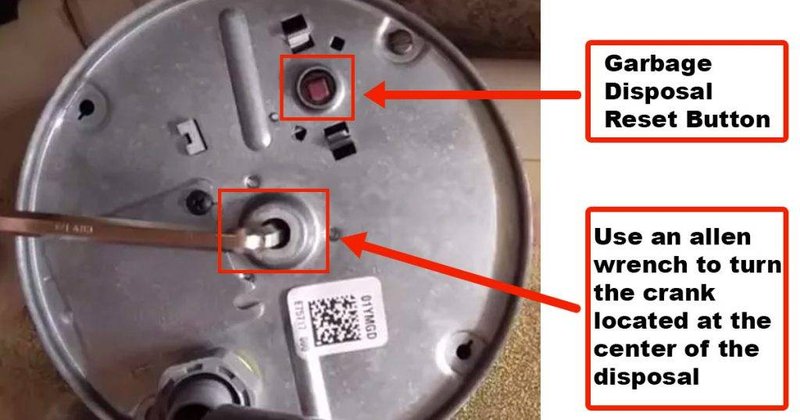
Step 3: Reset the Unit
With the jam cleared, it’s time to reset the unit. Locate the small red button on the bottom of the disposal; this is the reset button. Press it in until you hear it click, which means it has reset. Plug the unit back in or turn the power back on at the panel. Test the disposal by running cold water and flicking the switch on. If everything is clear and working, congratulations, you’ve successfully reset your Waste King!
Preventative Measures and Future Tips
Now that your disposal is up and running, let’s talk about keeping it that way. Just like you wouldn’t overfill a washing machine, it’s essential not to overwhelm your disposal. Avoid cramming large amounts of food at once and steer clear of putting in hard-to-grind items like bones or fibrous vegetables. Treat your disposal kindly, and it will reward you with years of reliable service.
Consider running cold water before and after using the disposal. Why cold water, you might wonder? Well, it helps solidify any grease or oils, making them easier to chop up and flush away. Hot water can melt the grease, leading to clogs further down the line. Cold water is the best companion for a smoothly running garbage disposal.
Lastly, if you notice your disposal frequently showing the “E1” error, it might be a sign of a bigger issue. Perhaps an underlying electrical problem or wear and tear on the unit. In such cases, it could be worth calling a professional to give it a thorough once-over and prevent future headaches.
When to Call a Professional
While most of the time, performing a reset and clearing simple jams can solve the “E1” error, there are instances where professional help might be necessary. If you’ve tried these steps and the error persists, you might be looking at a more complex electrical issue or mechanical failure.
Professional technicians have the tools and expertise to diagnose problems you might miss. It’s like having a car expert look under the hood — they can spot issues that aren’t obvious to the untrained eye. Additionally, they can assess whether the disposal is beyond repair, making a replacement the most efficient and cost-effective solution.
Don’t hesitate to reach out to the manufacturer if your disposal is still under warranty. Often, they can provide guidance or even cover the costs associated with repairs or replacements. Using authorized service agents ensures that any fixes align with the manufacturer’s standards, keeping your warranty intact.
And there you have it — your guide to tackling that “E1” error and keeping your Waste King garbage disposal in tip-top shape. Treat it well, and it will be one of your best kitchen allies for years to come!