The “SE” error code on an Insinkerator garbage disposal usually indicates a malfunction that requires a reset. It might sound complex at first, but resetting your disposal is typically a straightforward process that you can do on your own. Think of it as when your smartphone occasionally freezes and needs a reboot — the reset is a fresh start. The good news is that by following a few simple steps, you’ll have your disposal humming again in no time. Let’s dive into the nitty-gritty of how to tackle the SE error code like a pro.
Understanding the “SE” Error Code
Before we jump into resetting your device, it’s crucial to understand what the “SE” error code signifies. This will help you know what you’re dealing with and why a reset might be necessary. The “SE” code stands for “Sensor Error.” Just as a computer has sensors to detect issues, your Insinkerator is fitted with sensors to ensure everything runs smoothly. When these sensors detect a problem, they send a signal to stop the motor to prevent further damage.
Often, this error occurs when there’s a blockage or something jamming the blades, causing the sensors to trigger. Imagine your garbage disposal like a spinning carousel — if anything obstructs its path, it comes to a halt to avoid straining the motor. The SE error acts as a protective mechanism, akin to a home’s circuit breaker tripping to prevent an overload. Understanding this can reassure you that the unit is designed to protect itself rather than indicate a severe failure.
So, when you see the “SE” error code, think of it as a call for action. It’s your disposal’s way of saying it needs a bit of attention. While it might sound alarming, it’s generally an issue you can resolve without too much hassle. Next, let’s walk through the steps to reset your Insinkerator and get things back in working order.
Preparing to Reset Your Insinkerator
Now that you know what the “SE” error code means, it’s time to prepare for the reset process. First things first, safety is key. Always ensure your garbage disposal is turned off before you start fiddling with it. This is akin to shutting off the electricity before changing a light bulb — it’s all about safety. Locate the plug or switch under the sink and make sure it’s switched off. It’s a small step but crucial for your safety.
Next, you might want to clear the sink of any dishes or debris to give yourself a clean workspace. It’s much like cleaning your desk before you start a task — it helps you focus on the job at hand. Once your workspace is clear, take a flashlight and check inside the disposal to ensure nothing is visibly obstructing the blades. You’d be surprised at what you might find — anything from a chicken bone to a spoon.
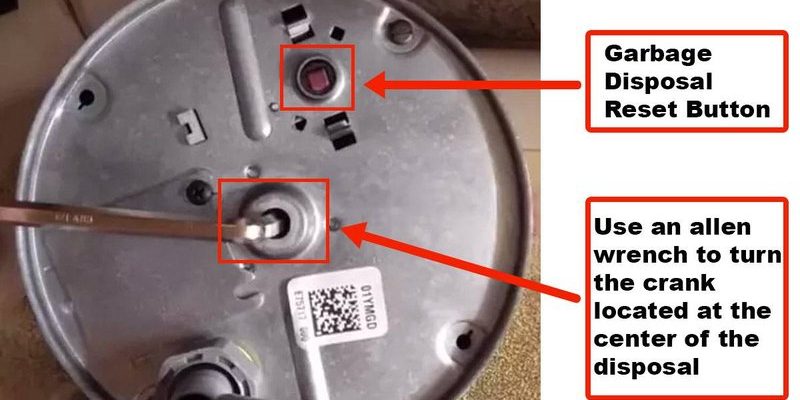
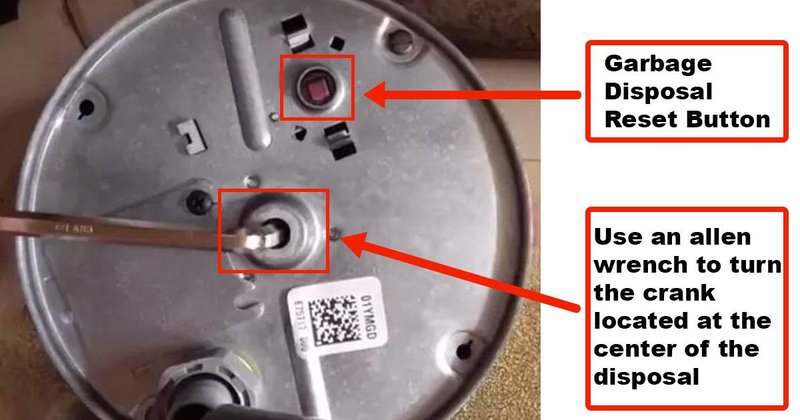
Finally, it’s worthwhile to have a wrench handy. Many Insinkerator models come with a small wrench specifically for resetting or manually turning the disposal. If your model includes this tool, locate it beneath your sink. If not, a simple hex wrench can do the trick. Ready to dive in? Let’s move on to the actual reset process.
Resetting Your Insinkerator
Here’s the moment you’ve been waiting for — resetting your Insinkerator. First, find the red reset button, usually located on the bottom of the unit. It’s a bit like finding the restart button on your Wi-Fi router. Firmly press the button and hold it for a few seconds. This action serves as a soft reset, akin to restarting a computer to clear minor glitches.
If the button won’t stay in or pops back out immediately, it might mean that the unit needs a minute to cool down. In such cases, give it a breather — about 10 minutes should suffice. It’s similar to letting your car engine cool before checking the oil. Patience here can save you from further complications.
After allowing your disposal to cool, try the reset button again. Once it clicks into place, plug the unit back in and switch on the power. Turn on the cold water tap and then flick the disposal switch to see if it roars back to life. More often than not, this simple reset will clear the “SE” error, and you’ll be back in action. If you’re still having issues, a deeper cleaning or calling a professional might be your next steps.
Preventative Tips and Maintenance
Now that you’ve successfully tackled the “SE” error code, let’s talk about keeping your Insinkerator in top shape. Regular maintenance can help prevent future errors and extend the life of your disposal. Think of it like regular dental check-ups — a little prevention can avoid bigger problems later on.
One of the simplest ways to maintain your disposal is by running cold water while using it. This helps solidify any fats or grease, allowing them to be chopped up more efficiently. Additionally, avoid overloading the disposal. Overloading is like cramming too many clothes into a washing machine — it makes it work harder and less effectively.
Lastly, occasional deep cleaning can do wonders. Grinding a few ice cubes and citrus peels can help clean the blades and eliminate any lingering odors. It’s like giving your disposal a refreshing breath of fresh air. Regularly checking for smaller items like bones or fibrous vegetables that might cause clogs can also keep things running smoothly.
So, there you have it — handling and resetting your Insinkerator garbage disposal isn’t as daunting as it seems. With these tips, you should be able to address the “SE” error code and maintain your unit with confidence. Enjoy the peace of mind that comes with knowing you can tackle these small hiccups like a pro!