You might be wondering what Error Code F2 actually means. In simple terms, it signals that your Insinkerator has encountered an overload. Think of it as your disposal saying, “I’ve had enough, give me a break!” This overload might be due to a surprise object jamming the blades or simply because it’s been working overtime. The good news? Most of the time, you can sort it out without calling in the cavalry. Let’s break down the steps to reset your disposal and get it purring smoothly again.
Understanding the Error Code F2
Before diving into the solution, it’s helpful to grasp what leads to Error Code F2. Essentially, this code is like the disposal’s version of waving a red flag. It activates when the motor encounters something that’s too much to handle, perhaps a leftover spoon accidentally thrown in or a particularly hard piece of food waste. When the disposal senses this stress, it shuts down to prevent damage.
Think of your garbage disposal like a merry-go-round. If someone tries to spin it too fast or place too much weight on it, it’ll stop to prevent any breakdown. That’s exactly what your Insinkerator is doing—protecting itself from harm. Knowing this, you can approach the reset process with confidence and care.
Now, you might wonder why the disposal has this self-preservation feature. Well, just like any appliance, constant wear and tear can take a toll. The F2 code helps prolong your disposal’s life by stopping further strain. Once you’ve understood why the code appears, tackling the issue becomes less daunting. You’re essentially giving your disposal a chance to breathe and recover from a workout!
Preparation Before Resetting
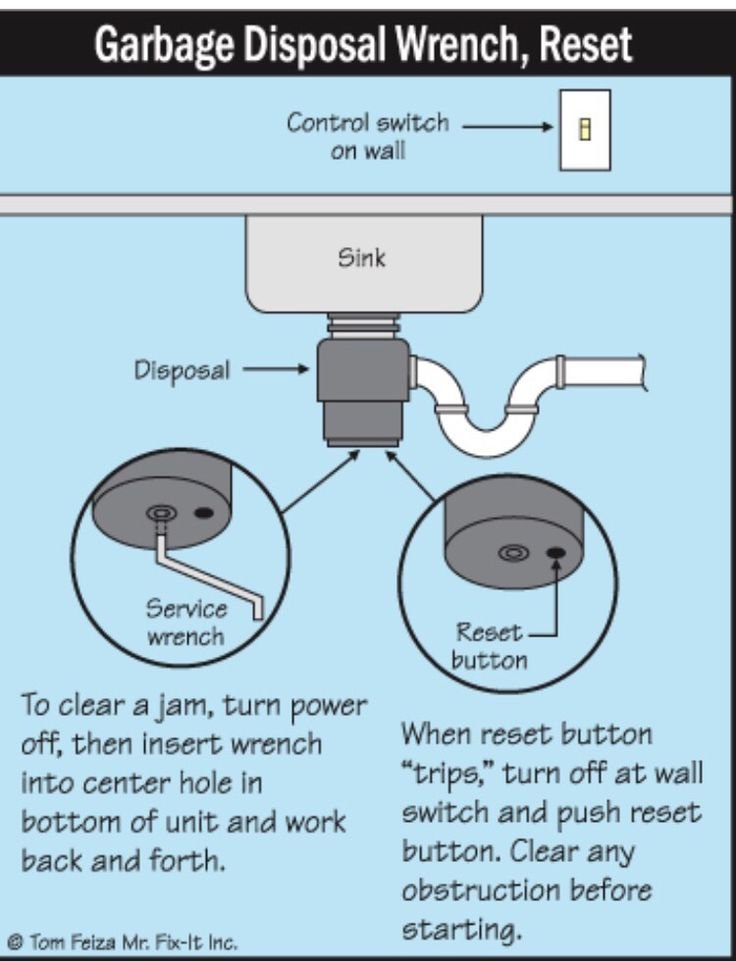
Okay, here’s the deal. Before you leap into the reset process, you need to make sure it’s safe to proceed. First and foremost, ensure the power to the disposal is completely off. You don’t want any unexpected surprises, like it starting up mid-repair. Locate your home’s circuit breaker—the pivotal switch that controls power to different parts of your house—and turn off the disposal’s power supply. If your disposal plugs into an outlet, simply unplug it. Safety first, always!
Next, let’s check for any visible obstructions. Shine a flashlight down into the disposal, just like you might check a mysterious noise under the hood of a car. Do you see anything unusual? If so, use tongs or pliers to carefully remove the object. Never use your fingers, as sharp blades can cause injuries.
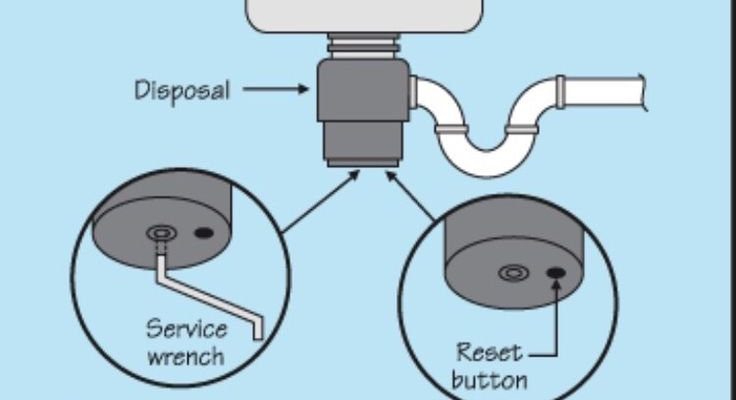
Once you’ve ensured it’s clear, manually turn the disposal blades to check for hidden jams. Most Insinkerators come equipped with an Allen wrench for this exact purpose. Insert it into the hex hole at the base of the disposal and rotate clockwise, then counterclockwise. This motion can loosen any stubborn debris obstructing the blades. Feeling things move freely? Great! You’re ready for the next step.
Resetting the Insinkerator
With the groundwork laid, you’re ready to reset the disposal. This part is like waking up a snoozing computer—easy and straightforward. Locate the red reset button. It’s typically on the underside of the unit, a little red button that’s easily overlooked.
Push the reset button just as you would press a reset button on a game console—firm but gentle. You should feel or hear a satisfying click, like flipping a light switch. This click signals that the disposal has been reset and is ready to get back to work.
Now, restore power by flipping the circuit breaker back on or plugging the disposal back in. Test it by turning on the water and flipping the disposal switch. Are things spinning smoothly? If so, congratulations! You’ve successfully reset your Insinkerator. If not, there might be a deeper issue at play, and it could be time to consult a professional.
Preventing Future Overloads
Now that you’ve tackled the Error Code F2, it’s wise to consider how to avoid similar issues in the future. Just like maintaining a tidy home prevents clutter, regular maintenance can keep your disposal in top shape. One simple strategy is to avoid stuffing your disposal with too much waste at once. Treat it with the same patience you would when feeding a baby—small, manageable portions are key.
Also, be mindful of what goes down the drain. Things like fibrous vegetables (think celery or onion skins) and starchy substances (like potato peels) can tangle or thicken, respectively, and jam the disposal. Consider them as unwelcome guests at a party—they’re just not meant to be there!
Lastly, make it a habit to run cold water through the disposal while it’s in use and for a few seconds after turning it off. The water acts as a gentle river, washing debris away and keeping pathways clear. With these simple practices, you can keep your Insinkerator running smoothly, avoiding any further F2 interruptions.
And there you have it—a beginner-friendly guide to tackling the dreaded Error Code F2. By following these steps, not only have you restored your handy kitchen assistant, but you’ve also gained a bit of DIY confidence to boot. Keep these tips in mind, and you’ll be well on your way to a worry-free kitchen cleanup routine!